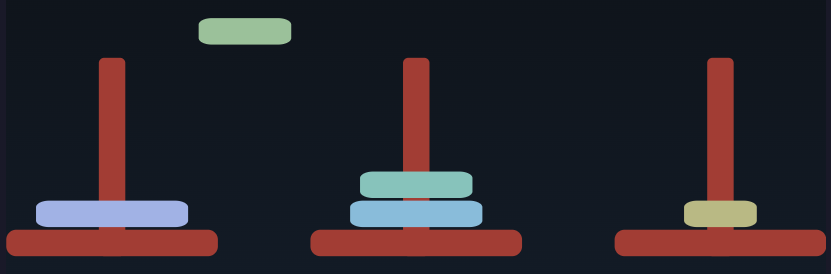
Hanoi Tower Breakdown
Step-by-step walkthrough of the Hanoi animation
What's Going On in the Hanoi Code?
The code for the Hanoi animation is a little more complex than the other examples. That's because I used it as a testbed for language ideas, so it has a little bit of everything mixed in. Let's break it down.
-
We start by setting up some parameters.
NumDisks = 5This is just a regular variable assignment. Change it, and the game updates.
Box.pole.fill = ~brown.lighten(5%)Boxis the prototype object for boxes. We can use it to set default values for all boxes. If I saidBox.fill = ~brown, then all boxes would be brown. Adding the.polemeans that only boxes tagged with classpolewill be brown.The
~brownis the name of a color. Picjs has all web colors built in, along withtransparent. It also has 24 theme colors, but I don't use them here.lighten()lightens the color, and5%is just syntactic sugar for0.05.DiskColor = rgb(220,180,140)As well as named colors, you can create colors using
rgb(),hsl(),oklch(), along with good old hex. Opacity can be set using an optional fourth parameter. -
Every value in picjs can have attributes. Some are predefined (a box has
.width), but you can also add new attributes by assigning to them. Perhaps surprisingly, we can use that simple idea to implement a kind of mixin: a function that adds state and functionality to another object.canHaveDisks = (aPole) => { disks = [] aPole.push = (disk) => { disks.push(disk) // return the position of the bottom of the disk aPole.s - (0, disks.length * (disk.ht + 2)) } aPole.pop = () => { disks.pop() } }In the Hanoi project, we have three poles, and each pole has a stack of disks. We want each pole to be able to push and pop onto and from those stacks, so we write a function that takes a pole and:
-
associates a list
diskswith it. Because thepushandpopfunctions referencedisks, it becomes a closure; each pole gets its owndiskslist. -
creates
pushandpopproperties on the pole. Each is a function that delegates to the disk stack. The push function also returns the position of the bottom of the disk (which is simply the number of disks on the pole times the height of each disk, with a little padding).
-
-
Here's the function that creates a pole.
drawPole = (number) => { pole = Box 20x150 rad 4 .pole at (100 + number*230, 300) Box .pole 160x20 rx 7.5 at pole.s - (0,10) // the base pole.number = number canHaveDisks(pole) pole }We position the pole at x=100+number*230, y = 300. The pole is 20x150, with a corner radius of 4. The
.poleis the class (remember, that picks up the style from the Box.pole.fill assignment above).The base is a horizontal box positioned so that its center is at the south end of the pole (the bottom). We overlap them slightly so we don't see the radius on the bottom of the pole.
We record the pole's number by setting a custom attribute. We then call
canHaveDisks, which is the function we looked at previously. This adds thepushandpopfunctions to the pole, and gives it adiskslist to manage.Finally, we return the pole.
-
Create the three poles:
poles = [0..2].map(drawPole) -
Create the disks and add them to pole #0:
[NumDisks..1].each(d => { @ += 0.3 disk = Box ht 20 wid 40 + d*15 rx 10 ry 5 fill DiskColor.spin(d*40) disk.s = poles[0].push(disk) }) @ += 0.3Disk 1 is the smallest, 2 the next biggest, and so on. We want the largest disk to be the first one pushed onto pole 0's stack, so we count down from
NumDisksto 1.Now we get to see some animation. I'd like the disks to appear one after the other: just a quick initial animation before the disk moving starts.
The variable
@is the offset on the timeline. By default, it's 0, but we can change it. When we say@ += 0.3, we move the time .3 seconds further. Because shapes are displayed at the current value of@, each disk will appear .3s after the previous one.After the last disk is drawn, we move the time pointer ahead another .3s, so there's a little pause before the moving starts.
-
Time to move some disks. There are two parts to this. The actual Towers of Hanoi algorithm decides which disk to move where. That comes later. This function is the second part: it handles the mechanics of updating the state of the poles and, along the way, animating the move.
moveDisk = (pFrom, pTo) => { distance = (pFrom.number - pTo.number).abs() // will be 1 or 2 disk = pFrom.pop() move disk.s to pFrom.n - (0, 10) ease "cubicIn" then move disk.s to pTo.n - (0, 10) ease "linear" take 0.3 + 0.3*distance then move disk.s to pTo.push(disk) ease "cubicOut" @@ }-
It's nice if the disks move between poles at a constant speed, which means that moving from pole 0 to pole 2 should take twice as long as moving to the center pole. That's why we calculate the distance moved.
-
pFromis the pole we're moving from. We pop the disk off. We then move it up past the top of the pole, then across to the destination pole, and then down onto its stack. Remember we had thepushfunction return the position of the bottom of the disk. Here's where we use that to control where the move stops. Note we usethenfor the second and third steps of the animation. This chains these animations into a single sequence: one will start when the previous one finishes. -
Then we have the cryptic
@@. This sets the@variable to the end of the last animation. It simply means we don't have to add up all thetakevalues ourselves.
-
-
Finally, we have the Hanoi algorithm itself.
hanoi = (n, pFrom, pTo, pVia) => { if (n > 0) { hanoi(n-1, pFrom, pVia, pTo) moveDisk(pFrom, pTo) hanoi(n-1, pVia, pTo, pFrom) } }- Let's call it and get those disks moving:
hanoi(NumDisks, poles[0], poles[2], poles[1])
Here's the full program:
NumDisks = 5
Box.pole.fill = ~brown.lighten(5%) // ~brown is a named color
DiskColor = rgb(220,180,140)
// This is just a regular function, but we're using it to define a mixin
canHaveDisks = (aPole) => {
  disks = []
  aPole.push = (disk) => {
      disks.push(disk)
      // return the position of the bottom of the disk
      aPole.s - (0, disks.length * (disk.ht + 2))
  }
  aPole.pop = () => {
      disks.pop()
  }
}
// draw a pole with a base.
drawPole = (number) => {
  pole = Box 20x150 rad 4 .pole  at (100 + number*230, 300)
  Box .pole 160x20 rx 7.5 at pole.s - (0,10) // the base
  pole.number = number
  canHaveDisks(pole)
  pole
}
poles = [0..2].map(drawPole)
// create the disks and add them to pole #0
[NumDisks..1].each(d => {
  @ += 0.3
  disk =  Box ht 20 wid 40 + d*15 rx 10 ry 5 fill DiskColor.spin(d*40)
  disk.s = poles[0].push(disk)
})

@ += 0.3
moveDisk = (pFrom, pTo) => {
  distance = (pFrom.number - pTo.number).abs()  // will be 1 or 2
  disk = pFrom.pop()
  move disk.s      to pFrom.n - (0, 10) ease "cubicIn"
  then move disk.s to pTo.n - (0, 10)   ease "linear" take 0.3 + 0.3*distance
  then move disk.s to pTo.push(disk)    ease "cubicOut"
  @@
}
hanoi = (n, pFrom, pTo, pVia) => {
  if (n > 0)  {
    hanoi(n-1, pFrom, pVia, pTo)
    moveDisk(pFrom, pTo)
    hanoi(n-1, pVia, pTo, pFrom)
  }
}
hanoi(NumDisks, poles[0], poles[2], poles[1])